Sunday, September 20, 2026

How to design user interfaces for CAD users

 If you create programs for CAD operators, AutoCAD or Inventor to name just two for example, it is important to get the interface correct. It is tempting to think that you know what is best, but unless you involve the user in the design you will almost certainly make something which annoys/irritates/angers/misleads them.

Whether you use C++ or C# or Python or whatever language the following tips apply.

Tip 1: Get to know what physically your program will result in.

For example if your program will create a new electric motor then understand, at least at a simple level, what the components do. Without that knowledge you are isolated from the actual work which the program should perform. If you conceive of the job as just a list of input numbers and strings you will have no idea of the relative importance of the inputs, what they represent physically. 

If you conceive of the job as just a list of input numbers and strings you will not understand what physical limits there are on these numbers (maxes and mins for example) and strings (component part numbers for example).

Tip 2: Give visual feedback in the user interface.

Have a preview of the component the software will create when the user clicks on the OK button. When a slider is dragged then the user should see the model change. It may not be practical to show the whole model, but a simple preview could give real time feedback as the slider is changed. 

A preview can also show obvious errors in the choices of the user. With just numbers (parameters) errors may not be immediately visible.

It is also nice for the user to be able to rotate and zoom the simplified preview.

Tip 3: Make the preview measurable in a CAD system. 

(This trick I have found very useful, more for the developer than the user.) I'll explain: My 3D previews of components and assemblies are actually 3D skeletal DXF files. These files are to scale. I have a method which shows the preview DXF in the form/dialog.

I create the DXF in memory, but have a button on the dialog which says "Save DXF..." This means you can actually open the preview in (for example) AutoCAD to check the measurements of the component. 

As I said, this is more for the software designer than the user, but it has saved me much time and allowed me to find and correct dimension bugs much quicker.

(The images below are very simple invented parts, I cannot show real complicated parts for NDA reasons.)


Thursday, April 9, 2026

Artificial Intelligence for Insects


A while ago I wrote these posts on how to implement neural networks on the Arduino. You can now get hold of neural network libraries for the Arduino, but the idea of my post was to explain really and in detail how neural networks worked with concrete functioning code.

And someone pointed out that there was not enough memory on a standard Arduino Uno V3 to make a really big useful neural network. That is true, but I bet we could make an insect sized brain on an Arduino!


Sunday, January 26, 2025

Finally I've understood how to generate all the permutations of N elements

 I need to create a list of all the permutations of a given array of numbers. And there is another condition, I wanted to do it following the bell ringer's style which means only two items are swapped from one permutation to another. Don't ask why I want to do this, I just do.

 As an introduction, if you have three numbers there are 6 ways of lining them up.

3  2  1
2  3  1
2  1  3
1  2  3
1  3  2
3  1  2

 So imagine there are three bells numbered 1 2 and 3. First ring in order 321, then in order 231 etc.

I could have listed them in any order, but in the above list you can see that from one row to another row only two elements are swapped.

So the list above follows the bell ringers way of, er, ringing bells.

Another thing to notice is that the biggest number, 3, moves diagonally in the sequence:

And yet another thing to notice is that the first and last sequences also follow the swap two bells rule, in this case the in the last row 1 2 becomes 2 1 in the first row.

 Anyway I thought it would be easy to write an algorithm to do this and found it was not. I looked for how other people had solved the problem.

There is Heap's algorithm, and I could implement it but I could not understand it. And I certainly could not understand the "proof" on that Wikipedia page. I'm not even sure if it is valid. Seems very complicated and abstract to me. I was encouraged by finding in another page (Ruslan) which said that though Heap's algorithm works Mr Heap did really not explain why.

Then there is the Steinhaus–Johnson–Trotter algorithm. This is easier to understand than  Heap's algorithm but I still felt it was a little abstract and I was not grokking the thing. I looked at implementations and kinda/sorta understood, but not deeply.

Then I found a PDF called Ringing The Changes by Burkard Polser and Marty Ross, part of the Millennium Mathematics Project, University of Cambridge. There is a diagram which I suddenly understood:


For 4 bells take the first 3 bell permutation, 123 in the above example, and slide 4 along it 4 times. Then when the 4 is at the extreme end (start or beginning) take the next 3 bell permutation and slide the 4 along it in the other direction.

Notice that from 4123 to 4213 only two numbers are swapped. This is because the 4 does not change its position, and the next 3 bell permutation is guaranteed to have only 2 swaps (from 123 to 213).

Now this I understood! And the proof was built into the explanation! Now all I had to do was implement it.

It was clearly a job for recursion, constructing a tree, and to grok it even deeper I drew what the tree would look like on a big piece of paper:


I highly recommend drawing when understanding is challenging. From the drawing...


You can see that the leaves of the tree contain the sequence I wanted. Before drawing this I had not understood that. Draw draw draw Owen!

You can see that the direction of insertion when adding the 4 into a 3 sequence changes with every change in the 3 sequence (the arrows above the 4 digits). Seeing that I assumed I'd solved the problem. It certainly works with permutations of 1 2 3 and 4 elements. So I implemented that algorithm with that idea, and it broke at 5 elements! I couldn't easily check the 5 elements manually (I'd need a huge piece of paper and more patience than I have). I had added some checking code in my algorithm and it found (and printed) errors where from one permutation to another there was not a simple swap of two elements.

So I went back to the diagram from Cambridge University. The problem I had was that I needed to know in what direction to make the insertions.

Leftwards is like this:

1234
1243
1423
4123

Rightwards is like this:

4123
1423
1243
1234

And the direction changes when the 4 is at the end or beginning of a sequence, making the zig zag shape along the permutations. 

But if I do this recursively how can I remember, at every level, in which direction to go the next time I'm at that level?  I mean the recursion was depth first. As an illustration look at the photo above and you can see that along the left branches of the tree  I construct this:

1
12
123
1234

And along the extreme right  branches of the tree I do this:

1
21
213
2134


My solution, inelegant, but working, was to have a global "next direction variable" at each level. And after adding a 4 (in our example) to an extreme end of a sequence I would change that direction flag. Thus, when I returned to that level in the tree I would know in which direction to insert the new number.

Here is the algorithm I came up with. It is longer than it needs to be because I've added checking and writing info to a file to help me see all is going well. And it is not exactly elegant, but I wanted something I could understand, to quote Shakespeare: "A poor thing, but mine own":

//

// Melody.cpp : This file contains the 'main' function. Program execution begins and ends there.
// Written by Owen F Ransen 2025-01-26
// Free to use by humans, robots: G&FY

#include <iostream>
#include <vector>
#include <list>

// I store the permutation in a variable length list...
typedef std::vector<uint8_t> IntList_t;

// How many elements...
#define MAX_ELEMENTS 10


static int iFinalPermutesMade = 0;
FILE* pFile = nullptr;
static IntList_t PrevPerm;

// A global which contains the "next direction" to go in at each level.
// There is a [MAX_ELEMENTS+1] for ease of access
// iDirections[0] is unused
// iDirections[1] is the root of the recursive tree.
// iDirections[2] is the direction to go in at level 2 in the tree
// iDirections[MAX_ELEMENTS] is the deepest level

static int iDirections[MAX_ELEMENTS+1]  ;

static void CreateNewPermutations(const IntList_t& InputPermutation)
{
    // ikNewNum This is four things:
    // 1) the new number to insert
    // 2) how many times it is to be inserted in different positions
    // 3) The length of the new permutations created
    // 4) The depth into the recursion tree
    const uint8_t ikNewNum = (const uint8_t)(InputPermutation.size() + 1);
    if (ikNewNum > MAX_ELEMENTS) {
        // This stops the recursion
        return;
    }

    // In which direction should I indert ikNewNum, +1 or -1
    const int ikDirection = iDirections[ikNewNum];

    // This is an out of range check
    if (ikNewNum > MAX_ELEMENTS) {
        printf ("ikNewNum = %d\n",ikNewNum) ;
        exit (0) ;
    }

    // Create ikNewNum new permutations in this for loop
    for (int i = 0; i < ikNewNum; ++i) {

        // This new perumation will become one bigger than the input permutation
        // But it starts with the input permutation
        IntList_t NewPermutation = InputPermutation;

        // These tell us if we have to change the direction of insertion
        // the next time we are at this level in the tree
        bool bAddedToHead = false ;
        bool bAddedToTail = false ;

        char szMsg[_MAX_PATH]; // For ebugging and explanation
        if (ikDirection < 0) {
            const size_t ikInsertPosition = ikNewNum - i;
            if (ikInsertPosition == ikNewNum) {
                // Append a new tail
                NewPermutation.insert(NewPermutation.end(), ikNewNum);

                sprintf_s(szMsg, "   [%u added to tail y]", ikNewNum);
                bAddedToTail = true ;

            } else if (ikInsertPosition == 1) {
                NewPermutation.insert(NewPermutation.begin(), ikNewNum);
                sprintf_s(szMsg, "   [%u added to head y]", ikNewNum);
                bAddedToHead = true;

            } else {
                NewPermutation.insert(NewPermutation.begin() + ikInsertPosition-1, ikNewNum);
                sprintf_s(szMsg, "   [%u inserted y at position %d]", ikNewNum, int(ikInsertPosition - 1));
            }
        } else {
            if (i == 0) {
                sprintf_s(szMsg, "   [%u added to head x]", ikNewNum);
                bAddedToHead = true;

            } else if (i == (ikNewNum-1)) {
                sprintf_s(szMsg, "   [%u added to tail x]", ikNewNum);
                bAddedToTail = true;

            } else {
                sprintf_s(szMsg, "   [%u inserted x]", ikNewNum);
            }
            NewPermutation.insert(NewPermutation.begin() + i, ikNewNum);
        }

        if (bAddedToHead) {
            // Change direction (next time at this level) because I've just added a head
            iDirections[ikNewNum] = 1;
            strcat_s(szMsg, "   [added to head, next dir =  1]");

        } else if (bAddedToTail) {
            // Change direction (next time at this level)  because I've just added a tail
            iDirections[ikNewNum] = -1;
            strcat_s(szMsg, "   [added to tail, next dir = -1]");
        }

        // Actually output the permutation if it is long enough
        if (ikNewNum == MAX_ELEMENTS) {
            iFinalPermutesMade++;
            {
                // Give a message to the DOS window every now and then
                if (iFinalPermutesMade % 100000 == 0) {
                    printf("total perms: %d\n", iFinalPermutesMade);
                }

                // The actual output of the permutation to a file...
                fprintf(pFile, "P %12d d=%2d:", iFinalPermutesMade, ikDirection);
                for (size_t j = 0; j < NewPermutation.size(); ++j) {
                    fprintf(pFile, " %2d", NewPermutation[j]);
                }
                fprintf(pFile, szMsg);
                fprintf(pFile, "\n");
            }

            {
                // For checking compare previous perm with this one,
                // there should only be two differences between the two permutations
                if ((PrevPerm.size() == MAX_ELEMENTS) && (NewPermutation.size() == MAX_ELEMENTS)) {
                    int iNumChanges = 0;
                    for (size_t j = 0; j < MAX_ELEMENTS; ++j) {
                        if (PrevPerm[j] != NewPermutation[j]) {
                            iNumChanges++;
                        }
                    }

                    if (iNumChanges != 2) {
                        fprintf(pFile, "!!!Num changes = %d\n", iNumChanges);
                    }
                }

                PrevPerm = NewPermutation;
            }
        }

        CreateNewPermutations(NewPermutation);
    }
}

int main()
{
    // Create the file where I will store the permutations...
    errno_t eErr = fopen_s(&pFile, "D:\\Temp\\OUTPUT.TXT", "wt");
    if (eErr != 0) {
        printf("Could not open file");
        return 0;
    }

    // Initilize directions
    for (size_t i = 0 ; i < _countof(iDirections) ; ++i) {
        iDirections[i] = 1 ;
    }

    // This original "permuation" is a list of 1
    IntList_t OriginalPermutation;
    OriginalPermutation.push_back(1);
    CreateNewPermutations(OriginalPermutation);

    fclose(pFile);
    pFile = nullptr;
}


#if 0
// Run program: Ctrl + F5 or Debug > Start Without Debugging menu
// Debug program: F5 or Debug > Start Debugging menu

// Tips for Getting Started:
//   1. Use the Solution Explorer window to add/manage files
//   2. Use the Team Explorer window to connect to source control
//   3. Use the Output window to see build output and other messages
//   4. Use the Error List window to view errors
//   5. Go to Project > Add New Item to create new code files, or Project > Add Existing Item to add existing code files to the project
//   6. In the future, to open this project again, go to File > Open > Project and select the .sln file
#endif
 

//
And here is some sample output when ikMax = 10:

P            1 d= 1: 10  9  8  7  6  5  4  3  2  1   [10 added to head x]   [added to head, next dir =  1]
P            2 d= 1:  9 10  8  7  6  5  4  3  2  1   [10 inserted x]
P            3 d= 1:  9  8 10  7  6  5  4  3  2  1   [10 inserted x]
P            4 d= 1:  9  8  7 10  6  5  4  3  2  1   [10 inserted x]
P            5 d= 1:  9  8  7  6 10  5  4  3  2  1   [10 inserted x]
P            6 d= 1:  9  8  7  6  5 10  4  3  2  1   [10 inserted x]
P            7 d= 1:  9  8  7  6  5  4 10  3  2  1   [10 inserted x]
P            8 d= 1:  9  8  7  6  5  4  3 10  2  1   [10 inserted x]
P            9 d= 1:  9  8  7  6  5  4  3  2 10  1   [10 inserted x]
P           10 d= 1:  9  8  7  6  5  4  3  2  1 10   [10 added to tail x]   [added to tail, next dir = -1]
P           11 d=-1:  8  9  7  6  5  4  3  2  1 10   [10 added to tail y]   [added to tail, next dir = -1]
P           12 d=-1:  8  9  7  6  5  4  3  2 10  1   [10 inserted y at position 8]
P           13 d=-1:  8  9  7  6  5  4  3 10  2  1   [10 inserted y at position 7]
P           14 d=-1:  8  9  7  6  5  4 10  3  2  1   [10 inserted y at position 6]
P           15 d=-1:  8  9  7  6  5 10  4  3  2  1   [10 inserted y at position 5]
P           16 d=-1:  8  9  7  6 10  5  4  3  2  1   [10 inserted y at position 4]
P           17 d=-1:  8  9  7 10  6  5  4  3  2  1   [10 inserted y at position 3]
P           18 d=-1:  8  9 10  7  6  5  4  3  2  1   [10 inserted y at position 2]
P           19 d=-1:  8 10  9  7  6  5  4  3  2  1   [10 inserted y at position 1]
P           20 d=-1: 10  8  9  7  6  5  4  3  2  1   [10 added to head y]   [added to head, next dir =  1]

...

...

P      3628781 d= 1: 10  8  9  7  6  5  4  3  1  2   [10 added to head x]   [added to head, next dir =  1]
P      3628782 d= 1:  8 10  9  7  6  5  4  3  1  2   [10 inserted x]
P      3628783 d= 1:  8  9 10  7  6  5  4  3  1  2   [10 inserted x]
P      3628784 d= 1:  8  9  7 10  6  5  4  3  1  2   [10 inserted x]
P      3628785 d= 1:  8  9  7  6 10  5  4  3  1  2   [10 inserted x]
P      3628786 d= 1:  8  9  7  6  5 10  4  3  1  2   [10 inserted x]
P      3628787 d= 1:  8  9  7  6  5  4 10  3  1  2   [10 inserted x]
P      3628788 d= 1:  8  9  7  6  5  4  3 10  1  2   [10 inserted x]
P      3628789 d= 1:  8  9  7  6  5  4  3  1 10  2   [10 inserted x]
P      3628790 d= 1:  8  9  7  6  5  4  3  1  2 10   [10 added to tail x]   [added to tail, next dir = -1]
P      3628791 d=-1:  9  8  7  6  5  4  3  1  2 10   [10 added to tail y]   [added to tail, next dir = -1]
P      3628792 d=-1:  9  8  7  6  5  4  3  1 10  2   [10 inserted y at position 8]
P      3628793 d=-1:  9  8  7  6  5  4  3 10  1  2   [10 inserted y at position 7]
P      3628794 d=-1:  9  8  7  6  5  4 10  3  1  2   [10 inserted y at position 6]
P      3628795 d=-1:  9  8  7  6  5 10  4  3  1  2   [10 inserted y at position 5]
P      3628796 d=-1:  9  8  7  6 10  5  4  3  1  2   [10 inserted y at position 4]
P      3628797 d=-1:  9  8  7 10  6  5  4  3  1  2   [10 inserted y at position 3]
P      3628798 d=-1:  9  8 10  7  6  5  4  3  1  2   [10 inserted y at position 2]
P      3628799 d=-1:  9 10  8  7  6  5  4  3  1  2   [10 inserted y at position 1]
P      3628800 d=-1: 10  9  8  7  6  5  4  3  1  2   [10 added to head y]   [added to head, next dir =  1]


Postscript: I was wondering, if I wanted to store the list of sequences, how to compress them. Up to a certain level, (16 bells) I could put two elements in a single byte. Then I thought I could simply store which two elements have been swapped. So an array of which elements to swap. I did a small test, this is for 4 elements, with the swapped elements in square brackets:


P   1 d= 1:  4  3  2  1
P   2 d= 1:  3  4  2  1 [  0  1 ] elements in positions 0 and 1 swapped
P   3 d= 1:  3  2  4  1 [  1  2 ] 
elements in positions 1 and 2 swapped
P   4 d= 1:  3  2  1  4 [  2  3 ]
P   5 d=-1:  2  3  1  4 [  0  1 ]
P   6 d=-1:  2  3  4  1 [  2  3 ]
P   7 d=-1:  2  4  3  1 [  1  2 ]
P   8 d=-1:  4  2  3  1 [  0  1 ]
P   9 d= 1:  4  2  1  3 [  2  3 ]
P  10 d= 1:  2  4  1  3 [  0  1 ]
P  11 d= 1:  2  1  4  3 [  1  2 ]
P  12 d= 1:  2  1  3  4 [  2  3 ]
P  13 d=-1:  1  2  3  4 [  0  1 ]
P  14 d=-1:  1  2  4  3 [  2  3 ]
P  15 d=-1:  1  4  2  3 [  1  2 ]
P  16 d=-1:  4  1  2  3 [  0  1 ]
P  17 d= 1:  4  1  3  2 [  2  3 ]
P  18 d= 1:  1  4  3  2 [  0  1 ]
P  19 d= 1:  1  3  4  2 [  1  2 ]
P  20 d= 1:  1  3  2  4 [  2  3 ]
P  21 d=-1:  3  1  2  4 [  0  1 ]
P  22 d=-1:  3  1  4  2 [  2  3 ]
P  23 d=-1:  3  4  1  2 [  1  2 ]
P  24 d=-1:  4  3  1  2 [  0  1 ]

Then I wondered if there was a pattern in which elements get swapped. If I could generate that pattern I could have a newer faster algorithm.

Here is the table above, just showing the swaps:

P   1 
P   2 [  0  1 ]
P   3 [  1  2 ]
P   4 [  2  3 ]
P   5 [  0  1 ]
P   6 [  2  3 ]
P   7 [  1  2 ]
P   8 [  0  1 ]
P   9 [  2  3 ]
P  10 [  0  1 ]
P  11 [  1  2 ]
P  12 [  2  3 ]
P  13 [  0  1 ]
P  14 [  2  3 ]
P  15 [  1  2 ]
P  16 [  0  1 ]
P  17 [  2  3 ]
P  18 [  0  1 ]
P  19 [  1  2 ]
P  20 [  2  3 ]
P  21 [  0  1 ]
P  22 [  2  3 ]
P  23 [  1  2 ]
P  24 [  0  1 ]
 

 I don't currently have the will power or brain power to determine the pattern in the swaps, but worth looking into. Also note that even a 16 element sequence would still only have two elements swapped each time.


Tuesday, August 27, 2024

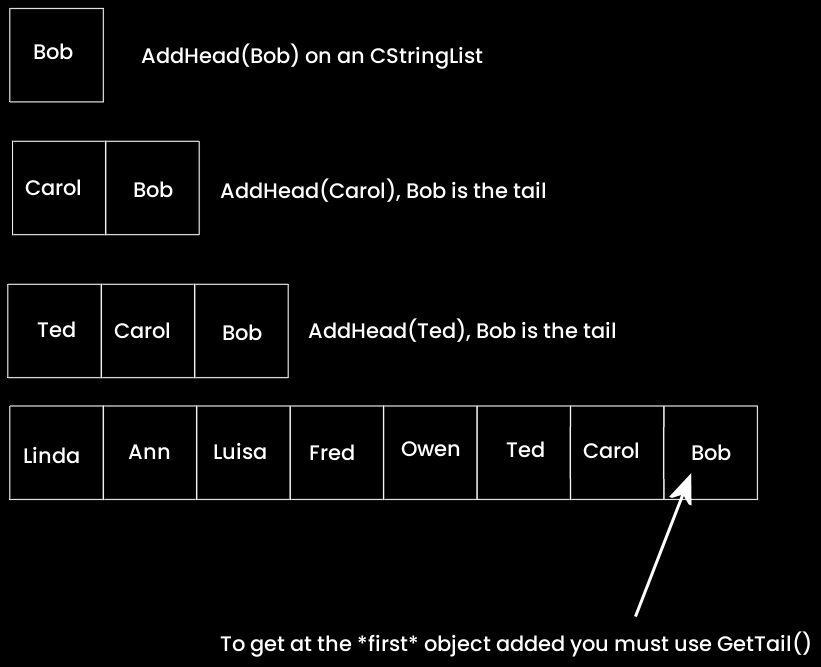
CList, CStringList, AddHead and GetTail etc explained

 The CList and CStringList classes confuse me every time I use them and I have to look up what is actually happening. So here is an explanation for my own use, and yours too I hope.

This applies to CList as well, but I'll stick to CStringList for ease of illustration

When you AddHead to an empty list, then make further calls to AddHead the list grows like this:


I often make lists I want to consume in the order I created them in. To do that, after creating the list I call GetTail() and then RemoveTail().

Here is how to loop over the list in forward or backward order:

   CStringList StringList ;

   StringList.AddHead("Bob");
   StringList.AddHead("Carol");
   StringList.AddHead("Ted");

   {
       gLogger.Printf(ekLogMsg, "In order of creation:");
       POSITION pos = StringList.GetTailPosition();
       while (pos) {
           gLogger.Printf(ekLogMsg, "<%s>", StringList.GetAt(pos).GetString());
           StringList.GetPrev(pos);
       }
   }

   {
       gLogger.Printf(ekLogMsg, "In reverse order of creation:");
       POSITION pos = StringList.GetHeadPosition();
       while (pos) {
           gLogger.Printf(ekLogMsg, "<%s>", StringList.GetAt(pos).GetString());
           StringList.GetNext(pos);
       }
   }

The output looks like this:

In order of creation:
<Bob>
<Carol>
<Ted>

In reverse order of creation:
<Ted>
<Carol>
<Bob>


Hope this helps both me and you.


Friday, May 27, 2022

A (better) explanation of (a part of) precompiled headers

 I've  searched for a long time for an explanation of precompiled headers in Visual Studio projects. A precompiled header can speed up compilation times. There is much about this on the Interweb. But not much about what I explain here.

 Precompiled headers are usually setup automatically by Visual Studio when you start a new C++ project, and you need not touch them much. But sometimes you need to change your project in some way and the precompiled headers just seem to get, er, what? Confused? Confusing. So here is what I have learned recently.

 They used to be "handled" by stdafx.h and stdafx.cpp but now are "handled" by pch.h and pch.cpp. As far as I can see this is just a name change.

 You add (much used but hardly ever changed) include files inside pch.h (or stdafx.h).

Now here is something I did not realize: You actually set the compilation properties of the individual CPP file to get the precompiled headers working. pch.cpp (or stdafx.cpp) is given the property of creating the precompiled header...


...and all the other files in your project are given the property of using the precompiled header...

When you do this you'll notice that if the precompiled header files need recreating, when you compile pch.cpp or stdaxf.cpp will get compiled first.

pch.cpp is usually an almost empty file with just the include of the h file:

#include "pch.h"

I hope this helps you...good luck!


Thursday, January 20, 2022

Verifone, the world's worst customer service.


I used Avangate for credit card processing of my online sales . All was fine. It was bought by 2 Checkout. All was fine. It was bought by Verifone. Since October 2021 last year my customers cannot download the programs they have paid for. This makes them angry and disgruntled as you may imagine. Since October 2021 I've been sending Verifone error reports:


So Verifone is ignoring all my customers, and me, their customer.

What do I have to do to get them to fix the problem?


Sunday, October 24, 2021

An easy way of improving the randomness of the random function in Arduino code

 Here is how to create two random numbers from 1 to 5 on an Arduino:

x = random (1,6) ;

y = random (1,6) ;

Don't be tricked by the 6. The actual output ranges from 1 to 5 in these examples. Anyway.

If you don't use the function randomSeed(iSeed)you will get the same sequence of random numbers every time you run your program. This is because random actually generates a pseudo random number, which means it loops through all available answers and then loops back to the beginning again. 

So randomSeed(iSeed)is used to start in a different place in the loop every time you run the program. iSeed  must vary to change the starting point of random

Often randomSeed is called in the setup part of the Arduino program.

But how can you choose a different iSeed every time you run the program? An often suggested method is to read a floating analog input. "Floating" means it is not connected to anything, so electrical fields wafting in from your hand or cell phone or brain move the electrons on the circuit board track which connects to the input. The moving electrons produce a tiny current and the tiny current produces a tiny change in voltage, which you read using the function  ???

 You can improve the random variation of voltage at A0 (for example) simply by adding a long wire to it!

Here's the board with no connection to A0:


And here are the variations in voltage...

A0, rand seed: 265, min 265, max 265, delta 0
A0, rand seed: 263, min 263, max 265, delta 2
A0, rand seed: 261, min 261, max 265, delta 4
A0, rand seed: 259, min 259, max 265, delta 6
A0, rand seed: 258, min 258, max 265, delta 7
A0, rand seed: 257, min 257, max 265, delta 8
A0, rand seed: 256, min 256, max 265, delta 9
A0, rand seed: 255, min 255, max 265, delta 10
A0, rand seed: 254, min 254, max 265, delta 11
A0, rand seed: 253, min 253, max 265, delta 12
A0, rand seed: 252, min 252, max 265, delta 13
A0, rand seed: 251, min 251, max 265, delta 14
A0, rand seed: 250, min 250, max 265, delta 15
A0, rand seed: 249, min 249, max 265, delta 16
A0, rand seed: 248, min 248, max 265, delta 17
A0, rand seed: 247, min 247, max 265, delta 18
A0, rand seed: 248, min 247, max 265, delta 18
A0, rand seed: 247, min 247, max 265, delta 18
A0, rand seed: 246, min 246, max 265, delta 19
A0, rand seed: 247, min 246, max 265, delta 19

... going from 246 to 265.

Here is the Arduino with a long wire connected to A0:


And here are the variations in voltage (with a long wire)...

A0, rand seed: 48, min 48, max 48, delta 0
A0, rand seed: 59, min 48, max 59, delta 11
A0, rand seed: 67, min 48, max 67, delta 19
A0, rand seed: 81, min 48, max 81, delta 33
A0, rand seed: 93, min 48, max 93, delta 45
A0, rand seed: 133, min 48, max 133, delta 85
A0, rand seed: 193, min 48, max 193, delta 145
A0, rand seed: 249, min 48, max 249, delta 201
A0, rand seed: 308, min 48, max 308, delta 260
A0, rand seed: 369, min 48, max 369, delta 321
A0, rand seed: 431, min 48, max 431, delta 383
A0, rand seed: 488, min 48, max 488, delta 440
A0, rand seed: 537, min 48, max 537, delta 489
A0, rand seed: 577, min 48, max 577, delta 529
A0, rand seed: 612, min 48, max 612, delta 564
A0, rand seed: 629, min 48, max 629, delta 581
A0, rand seed: 799, min 48, max 799, delta 751
A0, rand seed: 747, min 48, max 799, delta 751
A0, rand seed: 325, min 48, max 799, delta 751
A0, rand seed: 310, min 48, max 799, delta 751
A0, rand seed: 297, min 48, max 799, delta 751
A0, rand seed: 288, min 48, max 799, delta 751
A0, rand seed: 278, min 48, max 799, delta 751
A0, rand seed: 273, min 48, max 799, delta 751
A0, rand seed: 268, min 48, max 799, delta 751


...going from 48 to 799, clearly an improvement.

Remember the analog signal is not the random number, but how to make the seed for the random number generator function, random().

Here  is the code I used to do the test above:

/*
 * Adding a wire to a floating analog input can give a better range
 * of random seeds.
 */

// The setup() method runs once, when the sketch starts
void setup()   {                
    Serial.begin (9600) ;
}

// the loop() method runs over and over again,
// as long as the Arduino has power

int iMin = 1024 ;
int iMax = 0 ;
int iLoopResetCount = 0 ;

void loop()                     
{
    int iVal = analogRead (A0) ;
    if (iVal < iMin) {
        iMin = iVal ;
    }
    if (iVal > iMax) {
        iMax = iVal ;
    }
    
    Serial.print ("A0, rand seed: ") ;
    Serial.print (iVal) ;
    Serial.print (", min ") ;
    Serial.print (iMin) ;
    Serial.print (", max ") ;
    Serial.print (iMax) ;
    Serial.print (", delta ") ;
    Serial.print (iMax-iMin) ;
    Serial.println() ;
    
    delay(500);     

    iLoopResetCount+=1 ;
    
    if (iLoopResetCount == 25) {
       iLoopResetCount=0 ;
       Serial.println("loop reset") ;
       iMin = 1024 ;
       iMax = 0 ;
    }
}

And here is how in practice you use randomSeed:

/*
 * Move a servo to random positions every 10 seconds.
 */

// The setup() method runs once, when the sketch starts
void setup()   {                
    Serial.begin (9600) ;

    int iSeed = analogRead (A0) ;
    randomSeed(iSeed);
    Serial.print ("Seed = ") ;
    Serial.println (iSeed) ;
}

// the loop() method runs over and over again,
// as long as the Arduino has power
void loop()                     
{
    // Move a servo randomly between 0 and 180 degrees
    int iServoDegrees = random(0,181) ;    
    Serial.print ("Would move the servo to ") ;
    Serial.print (iServoDegrees) ;
    Serial.println (" degrees ") ;
    delay(10000);     // 10000ms = 10 sec
}


.